I’m a huge fan of Duo Security Multi-Factor Authentication scheme and I like how simple It Is to Implenent In a VPN Install like PiVPN. PiVPN was built to be installed on a Raspberry Pi, but it doesn’t have to. It has many benefits over a standard OpenVPN install because it can be configured to auto-update, it is simple to add/revoke users and it’s also “hardened” by default.
Before installing PiVPN, add a new user to the Pi so we can later disable the “pi” account.
adduser USERNAME -gid 1000
Follow the prompts to add a password for the new account and add additional details (Full Name, Room Number, etc.) if you like.
Install PiVPN
curl -L https://install.pivpn.io | bash
Follow the prompts during the installation. When asked which user, choose your new account.
TCP/UDP?
I prefer to use TCP on a non-standard port. In doing so, you may not be able to get to your VPN server on some networks that block outbound traffic on the port you configure.
Encryption Level?
Run OpenVPN with Elliptic Curve encryption or traditional encryption? If your VPN Client supports OpenVPN 2.4 or greater, then choose yes.
ECDSA Certificate Size?
I would choose 384-bit. Seems good enough.
Public IP or DNS?
If you have a static IP, simply select that entry. Otherwise, choose DNS and setup a Dynamic DNS entry to populate here. I use DynDns.org.
DNS Provider?
This is asking which DNS provider you would like to push to the VPN clients when they connect. I like OpenDNS.
Custom Search Domain?
Probably not needed but if you have your own domain in your environment, choose yes.
Let’s setup DUO
Login to the DUO admin interface and setup your user (username must match the username you just created in PiVPN) and Application. Follow this guide.
The steps are basically:
- Sign up for a Duo account.
- Log in to the Duo Admin Panel and navigate to Applications.
- Click Protect an Application and locate OpenVPN in the applications list. Click Protect this Application to get your integration key, secret key, and API hostname. (See Getting Started for help.)
- Download the current Duo OpenVPN package from our duo_openvpn GitHub repository right onto your Pi.
wget -O - https://github.com/duosecurity/duo_openvpn/tarball/master | tar xz
That command will download the current version and unarchive it. - Follow the rest of the instructions at the “Build and Install the Plugin” portion of the guide.
- Ensure Python 2.7 is installed on your OpenVPN server.
- Modify user config defaults to include the necessary
auth-user-passandreneg-sec 0in the OpenVPN config files. - Reboot the server or restart OpenVPN.
Create VPN User(s)
Create a VPN user without a password on the private key:
pivpn -a -n YOURUSERNAME nopass
– OR –
If you want an even more secure user, create a user with a password protected key. Eliminate the “nopass” option and supply a password. If you choose this option, you’ll need to enter it into your OpenVPN client.
pivpn -a -n YOURUSERNAME -p SECRETPASSWORD
PiVPN will create a new user, all the required certificates and the OVPN file.
Change permissions on the ovpn folder so we can copy them from the Pi to our machine.
chmod 655 /home/PIVPN-USER-USED-DURING-INSTALL/ovpns/
Finish the Process
Securely copy the .ovpn file(s) to your local machine then delete them from the server.
On a Mac, I use Shimo app as my VPN client. If you are on Windows, OpenVPN has a free client.
Keep in mind, if you created your PiVPN user key with a password, you’ll need to enter that into the client.
OpenVPN Client
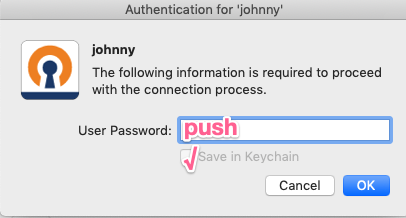
For OpenVPN client, you will enter the username and for the user authentication “password”, you enter in how you want DUO to authenticate you (push, sms, phone, etc.). If you are using push notification, enter in “push”. If you are always going to use push notification, “save” the password here.

Next you will be prompted for the “Private Key Password”. This is the password you entered into PiVPN when creating a new user.

If you didn’t supply a password when creating your user account in PiVPN, you don’t be prompted for the Private Key Password.
If all goes well, next you should get a DUO push notification on your phone to “approve” and your client should connect successfully!
If you want to use a passcode from the DUO app, leave the user account password blank (instead of entering in “push”) and when prompted, enter the 6-digit code from the DUO app.
Shimo App Client
With Shimo, it’s similar to the OpenVPN client. Basically, you’ll enter “push” into the user password and your secretPassword for the Private key.
To change defaults after the install:
To change the hostname or IP address, protocol or port after the installation you will need to change /etc/openvpn/easy-rsa/pki/Default.txt and your .ovpn files if you have already generated them.
Allow your clients access to the LAN:
In order for your clients to access the main LAN, we may need to add a NAT route. Check iptables to see if the route is already there.
iptables -t nat -L -n -v
I had this entry in my POSTROUTING seciton.
Chain POSTROUTING (policy ACCEPT 8 packets, 552 bytes)
 pkts bytes target     prot opt in     out     source               destination
    0     0 MASQUERADE  all  --  *      wlan0   10.8.0.0/24          0.0.0.0/0
As you can see, it shows up under wlan0. In my case, I setup my Pi while on wireless, however, I plan to connect it via CAT5. So, I need to add anotehr route for eth0. In our OpenVPN server.conf, we have “server” setup with 10.8.0.0 IP range. So, we need to add a NAT route like so:
iptables -t nat -A POSTROUTING -s 10.8.0.0/24 -o eth0 -j MASQUERADE
Setup a Dynamic DNS client:
See this guide for installing a Dynamic DNS client.
Setup alerts to “admins” when a user connects or disconnects:
Send an alert when a user connects / disconnects from the OpenVPN Server.